- Of course, you need a 9V DC adapter for power supply. I sometimes use the power supply from my PIC programmer which derives power from a USB port of my computer. But do this only if you are sure that the experiment you doing draws current which is within the safe limit of the USB port.
- Next, you also need jumper wires to interconnect the various terminals while doing experiments.
- It depends on you what kind of platform you want to choose for programming the PIC. If you want to use assembly language, you need to download MPLAB. It is free to download from the Microchip website. You can also find an installation guide for this, which might be helpful. However, I prefer high-level language like C for programming my PIC. I am going to use mikroC compiler from Mikroelektronika for all the experiments I am going to show here. You can download a demo version of this compiler for free. The demo version restricts the output HEX file size to 2K, but we don't care because PIC12683 doesn't have programming memory more than that. So, you decide.
Blogroll
| My PIC12F683 Development Board | |
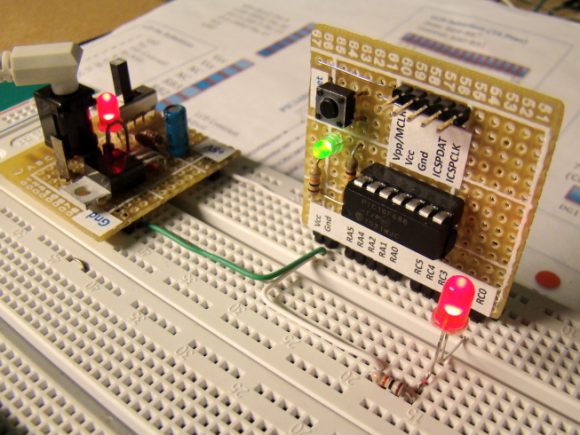
 Circuit diagram for each experiment may not be available separately because they are conducted with PIC12F683 development board that I made. So, the readers should first see the schematic of my development board.
|
|
Saturday, February 13, 2010
What else you need to start experimenting on this board?
After you finish constructing the development board, here are few more things to do before doing some real experiments with it.
Subscribe to:
Post Comments (Atom)
Online Embedded Systems Lab
|
This online laboratory teaches you the fundamentals of microcontroller-based embedded system development through a series of laboratory exercises. Most of the time, students and hobbyists could not afford expensive development kits and software to learn these things. These tutorials are prepared such that you will be building microcontroller projects at a minimum cost. Check this out |
0 comments:
Post a Comment